![[ANSYS, Inc. Logo]](fluentlogo.gif)


|
|
|
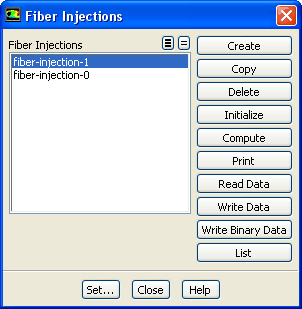
You will use the Fiber Injections dialog box (Figure 3.6.1) to create, modify, copy, delete, initialize, compute, print, read, write, and list fiber injections. To access the Fiber Injections dialog box, first make sure you enable a fiber model, then go to
 Models

 Fiber-Injections
 Edit...
Creating Fiber Injections
To create a fiber injection, click the Create button. A new fiber injection will appear in the Fiber Injections list and the Set Fiber Injection Properties dialog box will open automatically to allow you to specify the fiber injection properties (as described in Section 3.6.5).
Modifying Fiber Injections
To modify an existing fiber injection, select its name in the Fiber Injections list and click the Set... button. The Set Fiber Injection Properties dialog box will open, and you can modify the properties as needed.
Copying Fiber Injections
To copy an existing fiber injection to a new fiber injection, select the existing injection in the Fiber Injections list and click the Copy button. The Set Fiber Injection Properties dialog box will open with a new fiber injection that has the same properties as the fiber injection you have selected. This is useful if you want to set another injection with similar properties.
Deleting Fiber Injections
You can delete a fiber injection by selecting its name in the Fiber Injections list and clicking the Delete button.
Initializing Fiber Injections
To initialize all solution variables of the fibers defined in a fiber injection, select its name in the Fiber Injections list and click the Initialize button. The solution variables will be set to the boundary condition values at the starting points of the fibers.
You can select several fiber injections when you want to initialize several fiber injections at one time.
|
|
If you do not select a fiber injection and click the
Initialize button, all fiber injections will be initialized.
|
Computing Fiber Injections
To solve the fiber equations of a fiber injection for a number of iterations, select its name in the Fiber Injections list and click the Compute button. The solution variables of the fibers defined in this fiber injection will be updated for the number of iterations specified in Figure 3.8.1.
You can select several fiber injections when you want to compute several fiber injections at one time.
|
|
If you do not select a fiber injection and click the
Compute button, all fiber injections will be computed.
|
Print Fiber Injections
To print the fiber solution variables of a fiber injection into a file, select its name in the Fiber Injections list and click the Print button. A file name is generated automatically based on the name of the fiber injection and the number of the fiber. The solution variables of each fiber is stored in a separate file. You may use this file for an external post-processing or analysis of fiber data.
You can select several fiber injections when you want to print several fiber injections at one time.
|
|
If you do not select a fiber injection and click the
Print button, all fiber injections will be printed.
|
Read Data of Fiber Injections
To read the data (properties and solution variables) of a fiber injection previously stored in a file, click the Read Data button. A file selection dialog box is opened where you can select the name of the file in a list or you can enter the file name directly. The names of all fiber injections included in the file are compared with the fiber injections already defined in the model. If the fiber injection exists already in your model, you are asked to overwrite it.
Write Data of Fiber Injections
While the settings of the continuous fiber model for numerics and models are stored in the ANSYS FLUENT case file, the data of the fibers and defined injections have to be stored in a separate file. To write the data of a fiber injection to a file, click the Write Data button. A file selection dialog box is opened where you can select the name of an existing file to overwrite it or you can enter the name of a new file.
You can select several fiber injections when you want to store several fiber injections in one file.
|
|
If you do not select a fiber injection and click the
Write Data button, all fiber injections will be stored in the specified file.
|
Write Binary Data of Fiber Injections
To write the data of a fiber injection in binary format to a file, click the Write Binary Data button. A file selector dialog box is opened where you can select the name of an existing file to overwrite it or you can enter the name of a new file.
You can select several fiber injections when you want to store several fiber injections in binary format in one file.
|
|
If you do not select a fiber injection and click the
Write Binary Data button, all fiber injections will be stored in binary format in the specified file.
|
List Fiber Injections
To list starting positions and boundary conditions of the fibers defined in a fiber injection, click the List button. ANSYS FLUENT displays a list in the console window. For each fiber you have defined, the list contains the following (in SI units):
 ,
,
 , and
, and
 position of the starting point in the columns headed
(X),
(Y), and
(Z).
position of the starting point in the columns headed
(X),
(Y), and
(Z).
The boundary conditions at the take up point are also listed. This list consists of the following (in SI units):
 ,
,
 , and
, and
 position of the take-up point in the columns headed
(X),
(Y), and
(Z).
position of the take-up point in the columns headed
(X),
(Y), and
(Z).
You can select several fiber injections when you want to list several fiber injections.
|
|
If you do not select a fiber injection and click the
List button, all fiber injections will be listed.
|
Previous:
3.6.2 Fiber Injection Types